Adding a Task for Action
To add a new task for either a member of staff or a staff group within Daybook:
- From Daybook, select Task
 New Task.png) .
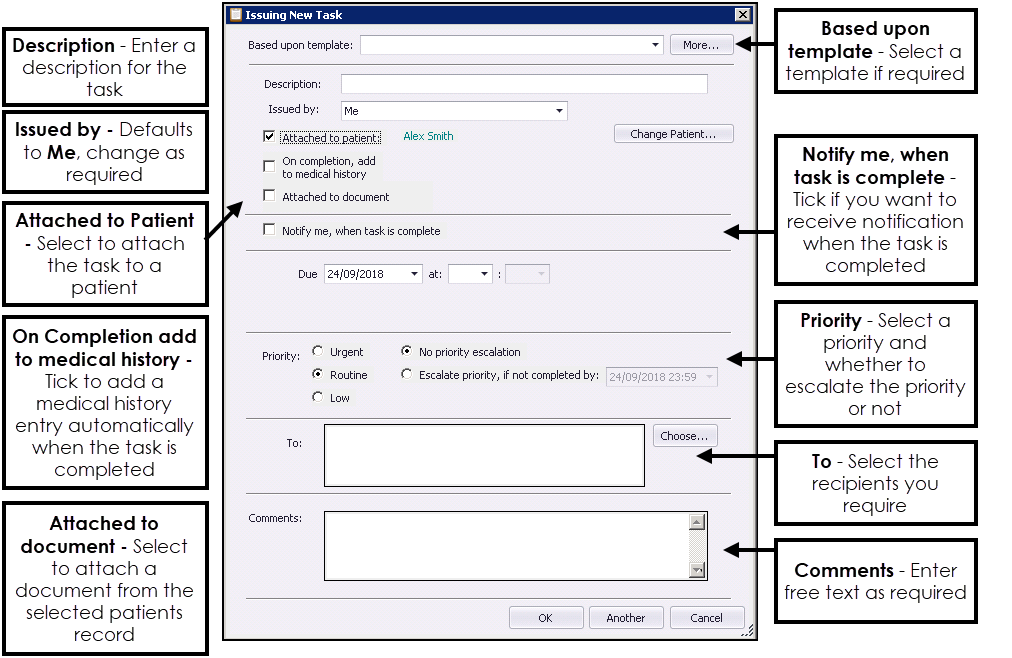
. - The Issuing New Task screen displays:

- Complete as required:
- Based upon template - Allows you to select a predefined task from the Frequent Templates list, see Task Templates for details.
- More - Allows you to select any predefined task, see Task Templates for details.Note - If you are using a template, some of the following steps may be completed automatically but can be altered as required.
- Description - Enter a description for this task, for example, Make appointment for patient.
- Issued by - Select who the new task is sent from, it defaults to Me, but you can select from any group you are a member of:

- Attached to patient - Tick to attach this task to a patient. To select the patient select Change Patient
 and select a patient in the usual way, see Selecting a Patient if required.
 - On completion, add to medical history - Tick to add a medical history entry automatically when the task is completed. To select the Read code select Change Read-code
 and select a Read code in the usual way.
 - Attached to document - Tick to attach a document to this task. A list of documents on the selected patient's record displays for selection.
- Notify me, when task is complete - Tick if you want to receive notification that the task has been completed.
- Due - If there is a time frame attached to this task, select a due date, and time:

- Priority - Select a priority:
- Urgent (
 precedes the task within your task list)
 - Routine (
 precedes the task within your task list)
 - Low (
 precedes the task within your task list)
 - No priority escalation - Selected by default, prevents the priority of the task from being escalated.
- Escalate priority, if not completed by - Tick to automatically raise the priority of a task should it not be completed by the date specified in the original task:
- Urgent (

- To - Select the recipients required by either:
- Typing into the To box, a list of matching recipients and/or groups appears. To select from the list use the up and down arrows and press enter. You can also type me to select yourself or all to select everybody in the practice.
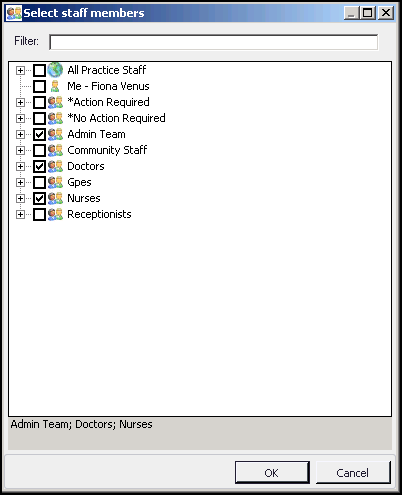
- Select Choose
 to view the hierarchical list of staff groups. Ticking any group or individual enters them into the To list, ticking again removes them.
Note - Staff Groups are set up within Control Panel and, if you are not already using Staff Groups for Mail Manager purposes, should be set up before Daybook is used, see Managing Staff Groups for details.Important - All members of staff are currently available from the Select staff members list, whether they have security access to Daybook or not. Ensure that the member of staff you want to allocate a task to has security access to Daybook.
 Note - Even if a member of staff is in more than one group, they only receive one copy of the task.
- Comments - Type free text as required. If this task is linked to a patient, you can press the Insert key on your keyboard to list their medical records, select a record to insert in the text and select OK to save and return to the task. The Insert process can be repeated to add more than one medical record. See Adding Clinical Information to a Task for details.
Note - The \ | { } characters do not display within Comments.- Another - Saves the current Task and presents a new Issuing New Task screen.
- Select OK to save and send.
The Task now displays in the To-Do list of the selected recipient(s).
Note - To print this topic select Print  in the top right corner and follow the on-screen prompts.